
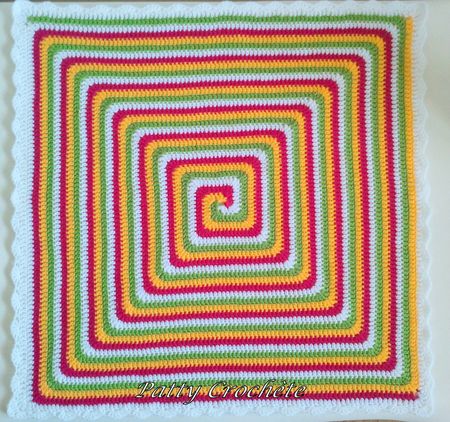
I love rainbows, and in my travels around the web the same picture kept coming up for rainbow granny spirals: The Granny Spiral by Patty Crochète. This was it, the one. It was calling me.
One small problem - the pattern is written in French (although with an excellent photo tutorial) and I could not find a proper English translation anywhere! Google Translate helped a bit, as did some excellent Googlefu (and proper reading) from the ladies in the Creative Crochet Crew group on Facebook. I really believed there was a market for this pattern in the English speaking world, especially as I had seen it in so many places, on so many Pinterest boards and inspiration boards.
The incredible designer of this square, Patricia Damême, can be found on her blog here, her Facebook page here, and on Pinterest here, and I absolutely recommending checking her out in all of those places as her work is just amazing.
With her permission, the English translation of the Solid Granny Spiral Square :D, which is also available on Ravelry for easy queueing or favouriting for later!
--------------------------------------------------------------------
PATTERN TRANSLATION: SOLID GRANNY SPIRAL SQUARE
Translated from: The Granny Spiral by Patty Crochète
Ravelry Link: http://www.ravelry.com/patterns/library/solid-spiral-granny-square
Translated from: The Granny Spiral by Patty Crochète
Ravelry Link: http://www.ravelry.com/patterns/library/solid-spiral-granny-square
--------------------------------------------------------------------
Abbreviations (US terms):
ch = chain stitch
dc = double crochet
tr = treble crochet
sl st = slip stitch
You'll need 4 colours of the same weight yarn.

Notes:
* All stitches are worked in the top of each stitch of the previous row, not between the stitches, unless otherwise specified. You could do an interesting variation with using back loops only, or both loops for a smooth finish.
* I don't recommend using the Magic Circle to start this square, as it makes the square rows twist a bit.
* As you stop working with each yarn, pull up a nice big loop or use stitch markers so you don't accidentally undo all your lovely work
* To stop your yarns getting tangled, at the end of each sequence of four colours turn your work ANTI CLOCKWISE to get back to the first colour. If you keep turning the same direction, you'll get an awful mess.


* If you get lost in the Steps 4 and 5 repeats, just remember that in each colour, the (dc, tr) (tr, 2dc) and (2dc, tr) (tr, dc) sequences alternate - just check what you did last corner! The current corner should also be the opposite to the one directly underneath.

STEP 1
With Colour A, ch 5, sl st into 1st ch to form a ring. Ch 3, 2dc into ring. The 3 chain of each colour is the loop you'll need in Step 3.

STEP 2
With Colour B, **join to ring. Ch3, 2dc into ring.** Repeat ** to ** for Colours C and D.


STEP 3
With Colour A, **(dc, 2tr, dc) into 3ch loop of next colour.** Repeat ** to ** for Colours B, C and D.

STEP 4
With Colour A, **dc into each dc of the previous row. In 1st tr of previous row, (dc, tr). In 2nd tr of previous row, (tr, 2dc).** Repeat ** to ** for Colours B, C and D.

STEP 5
With Colour A, **dc into each dc of the previous row. In 1st tr of previous row, (2dc, tr). In 2nd tr of previous row, (tr, dc).** Repeat ** to ** for Colours B, C and D.

STEP 6
Repeats Steps 4 and 5 until you get to one row short of your desired size.

STEP 7
To Finish: With Colour A, **dc in each dc, dc in 1st treble, dc in 2nd treble. Cut your yarn, leaving a tail for darning in, and pull through the loop on your hook. Weave in end.** Repeat ** to ** for Colours B, C and D.


And that's it! Ta-dah!
Update: I used the practice and tutorial squares to make up a Saggy Daggy Crochet Baggy - check out the photos here.
Update: I used the practice and tutorial squares to make up a Saggy Daggy Crochet Baggy - check out the photos here.
The spiral is gorgeous!
ReplyDeleteHave a great week!
Thanks Lucie! If you try it, let me know ;) Although I guess the French pattern would be better for you anyway!
DeleteThank you much I really liked this!
DeleteAwesome!!!
ReplyDeleteIngrid xx
http://myfunkycrochet.blogspot.be
Thanks Ingrid! If you try it, let me know how it goes :)
DeleteCool pattern! Would make lovely cushions.
ReplyDeleteThanks Pradeepa! Cushions is a great idea :P I used the test squares to make a Saggy Daggy Project Baggy - there are photos here: https://www.facebook.com/wrappedwithlovebymichelle/posts/563375693808799
DeleteLooks great and really nice and colorful! :-)
ReplyDeleteThanks :)
DeleteWhat a wonderfully helpful and clear tutorial - I'm definitely going to give it a go. Can you tell me whether you've had any trouble with the Stylecraft yarn fading? I crocheted a blanket for my daughter using Spotlight's Moda Vera acrylic and it has faded dreadfully. I am keen to try the Stylecraft as it has had rave reviews but am worried about it fading in our strong sun in N.Z. Has this been a problem for you in Australia? Thanks heaps, Alison
ReplyDeleteHi Alison, I haven't had the Stylecraft for long enough to know whether it will fade! I'll let you know if I notice any problems :) Perhaps someone else could help?
DeleteMy beautiful stylecraft special dk cushions faded terribly. Very upset and wish I'd known to keep them out of the sunlight
DeleteOh no! Thanks for sharing though, hopefully this information will help someone else :)
DeleteAwesome and hippy styles I love. I'm making one now so I will let ya know how it goes. LOVE this pattern :-D
ReplyDeleteI'm so glad you like it! Post a pic on our facebook page when you're done? And if you have any problems, just shoot me a message :)
DeleteI'm following your pattern. Thanks for the tips about keeping the yarn unlabeled. I was hoping to make it about 36 inches square, but it's buckling. Should I be adding more stitches to prevent this?
ReplyDeleteNever mind Michelle. I looked at the pattern again and see where I went wrong.
ReplyDeleteI'm glad you worked it out :) If you're making it bigger, just make sure you end up with the same number of rows on each side - otherwise it won't come out square!
DeleteThank you so much for translating this! I have found this design all over Pinterest, but all lead to the French instructions. When I saw this design, I knew I just had to make it. But I knew I would never have time to figure it out and I almost gave up because I couldn't find another pattern that came anywhere close to looking like this one. I'm grateful that you found time to do this for people like me who love to create, but have little time to search for usable patterns. You're amazing! Thanks again, Melissa
ReplyDeleteMy pleasure Melissa! I was in exactly the same position as you, which is how this translation came to be :) Let me know if you make something with it, put it on Ravelry maybe?
DeleteThanks for sharing! Appreciated!
ReplyDeleteMy pleasure!
DeleteCan you make a video of this I'm still fairly new to crocheting and don't read patterns very well. I'm planning to make a blanket for my hubby using black 2 different blues and a purple to make it look like a work hole :)
ReplyDeleteMaking videos is in my long-term plan - I have to get the right equipment, and then the time! Videos are really time consuming. Hopefully the pictures in the tutorial above will help though :)
DeleteI just started trying this pattern. I put my 4 skeins in a divided box on the floor and just rotate the box as I crochet without tangling my threads.
ReplyDeleteThat is such a good idea! :)
DeleteThis pattern is brilliant. Thank you so much for providing the English translation. And thank you, Barbara, for the idea of the divided box. What a wonderful crochet community!
ReplyDeleteOur pleasure Judy! :)
DeleteI've made 3 baby blankets for friends and family using this pattern. Since babies' eyes are still developing, bold geometric patterns are good for infamy brain development. And what new parent doesn't need an extra blanket?
ReplyDeleteThey always turn out beautifully, making happy parents. My cousin's oldest loves his spiral blankie, too
I'm glad it works well for you! :)
DeleteEstá hermoso, lo voy hacer. Muchas gracias
ReplyDelete